Hello all, sorry for the absent from this blog, I just want to share a quick new post about this new amazing little lens that got me so excited:
Laowa 7.5mm f/2.0 for Micro Four Thirds. At a glance, you can tell that this is a one-of-a-kind lens in the ultra-wide angle genre, due to the fact that it offers a really wide focal length, paired with a very large aperture that you never encounter on an UWA lens in any format and mount so far, without going to fish-eye teritory or aperture less than f/2.8.
 |
| The little Laowa 7.5mm f/2 |
To boot up, this lens delivers the equivalent field of view of 15mm in full frame terms, which is really wide, and perfect for stuffs like landscape, architecture, interior, vlogging, environmental portraits, and just overall wide-angle-ly stuffs. Coupled with f/2.0 fast aperture, it's now passable as an astrophotography lens, night landscape, and similar niche photographic genres.
 |
| This wasn't taken from the Svalbard and Norway trip, but it should show what the Laowa could do. Warning: the stars were added in post processing using stacked layer from another photo, but the rest are from the real scenery. |
The size of the lens is really small. I mean, really really small. Smaller than the Panasonic 14-42mm f/3.5-5.6 II kit lens that comes together with the GX7 when I bought it.
It's no pancake, but it's smaller than most non-pancake primes for MFT. It is lightweight, but not to the point where it feels cheap and plasticky.
 |
| Laowa compared with the kit 14-42mm II from Panasonic |
This is a manual only lens, meaning that there is no autofocus, there is no electrical contact to the camera body, and the user will need to set both the aperture and the focus manually by rotating the ring-levers for the respective functions on the lens. This lack of auto-focus and aperture may be a deal breaker for some, especially the auto-focus, but keep in mind that this is a wide angle lens. You can figure out the hyperfocal distance of the depth of field area for this lens, which is about 3 meters or 4 meters at f/2.0, and everything from there to infinity will be acceptably and relatively sharp. That basically means, just set the focus lever to infinity, and leave it there for the rest of your life, and you'll get sharp result, as long as your subject is at least 3-4 meters away.
 |
| Do you want bokeh? Here's your bokeh. I don't think I'll ever shoot bokeh stuffs with this lens anymore though, unless I really have to. |
For a test drive, I took the lens on my recent trip around northern Norway to places like Honningsvag, Hammerfest, Tromso, as well as to the northern edge of the earth in the island of Svalbard where I visited Longyearbyen, Barentsburg, Pyramiden, and some other places around there. The trip required me to have a wide angle lens to photograph the sceneries, and my pre-ordered Laowa came just right before the trip.
 |
| Honningsvag, a lovely quiet little town that used to be a very busy fisherman center. |
The timing couldn't be better, I wanted to carry the Laowa for its wide 7.5mm focal length instead of the somewhat limiting 9mm of my Olympus 9-18mm, which was proven not wide enough during my New Zealand trip a month before this trip. The Panasonic 7-14mm that I have is wide enough, but it is larger and heavier than the Laowa, so it's not really my first-choice although it is sharp, has an AF, and could produce wonderful IQ. Just a few extra grams on the 7-14mm could add so much burden to my shoulder over a long period of carrying the lens in my bag, which obviously makes the Laowa a very compelling choice for this trip, for both its light-weight and wide focal length.
 |
| Inside the Hammerfest Church. The f/2 aperture helped me to get stable shot at relatively good shutter speed and low-ish ISO, so I don't need to rely on tripod. |
I visited these places on the month of July, so there was a lot of sunshine. There's even no sunset on some places that I visited during that period of time! This is a natural phenomenon commonly found in Arctic region called midnight sun.
 |
| The settlement of Longyearbyen in Svalbard, with the sun in the frame. This was about 11pm in the evening! |
The trip, while not emphasizing on landscape photography significantly, was nevertheless a good chance for snapping general travel photography pictures. That means cityscapes, landscapes, street photography, candid portrait, documentation, and other genres of photography commonly incorporated in travel photography. For most of the time, I had my Panasonic GX8 with either a 14-140mm or a 12-35mm f/2.8 bolted on it to cover most of my photography and video needs, but I also brought my Laowa 7.5mm which was bolted to my GX7.
 |
| Fisherman village near Honningsvag. Cityscapes like this easily fit into the 7.5mm field of view of the Laowa. |
In northern Norway, the lens was employed many times to photograph many landscapes and cityscapes of the visited places. However, in Svalbard, the opportunity to photograph landscapes was more limited due to the fact that we were not allowed to wander alone and/or without a rifle in less-populated area because of the danger of polar bears roaming around. I was limited to photograph landscapes that were "readily available" nearby the settlement which did not require me to have a qualified guide and/or a rifle.
 |
| Camp Barentz, named after the founder of Svalbard or Spitsbergen. Even to photograph this scene, I needed to have a guide armed with both rifle and a flare gun to guard me from the danger of Polar Bear. |
I was expecting this lens to be a full replacement for my current wide angle lenses in this trip, and with that in mind, here are some things that I found from using the Laowa lens for a few days.
What I like from this lens?
The thing is just acceptably sharp at f/2, but
it starts to show some real magic at f/2.8. Stopping down to f/4.0 will give you the optimum result. The little lens seemed to be sharper in the center of the frame than in the edges or corners at its larger apertures, but the difference of sharpness between center and the corners are not that significant, so you won't be bothered anyway.
 |
| Spending a short fun time in Tromso, Norway. |
Micro contrast is pretty high, and there's almost no chromatic aberration, at least on my copy of the lens. That means, this lens will generate a very high quality looking image without the need of too much post-processing in regards to contrast and lens-correction.
 |
| The scenery of Longyearbyen settlement. They have no sun during winter, and sun 24/7 during summer. |
Distortion, while present, is not too bad for an ultra wide angle. It doesn't show up in your picture immediately, unless you shoot stripes or square patterns in your image. My Panasonic 7-14mm f/4.0 would show less distortion on the final result, but that's beause there is some auto-correction happening in the camera body. My Olympus 9-18mm f/4-5.6 would do the same thing too. Keep in mind, the Laowa doesn't have that magical digital correction like the Panasonic or Olympus lenses, it's a full manual lens.
 |
| The city of Tromso, taken from above the hill of Storsteinen. |
Build quality of this lens is good. It feels sturdy, there are lots of metal parts being used in the body of the lens, and there is no "loose" part jingling around in the lens. The manufacturer provides a small petal shaped lens hood that does nothing to kill the flare, but at the very least helps to protect the front element of the lens.
I quickly replaced the hood with a more useful 46mm-58mm step up ring, so now I can use my whole array of 58mm filters that I can interchange between the Laowa and my other lenses like my 12-35mm, 14-140mm, 35-100mm, and 75mm.
 |
| Yeah, it takes filter now, so you can mount your filter holder and put some crazy NDs right there! |
Speaking of the step up ring, the 46mm thread on the front of the lens means the lens now provides the opportunity for us to put filters on it. Say what you want about filters, but the ability to put at least an ND filter is a real bonus here. Heck, I can now put my old Hitech filter holder, and snap a Lee Big Stopper together with two 0.6 Grad NDs to create "the perfect landscape setup". No vignetting, no cow poo, just a real awesome filter setup. (By the way, a 105mm polarizer ring on the Hitech holder does show up on the corners of the frame, so I guess you can't really use a 105mm polarizer on a holder with the Laowa)
 |
| Typical scenery of Svalbard/Spitsbergen, very rocky, with very little vegetation, and lots of pointy mountain, hence the name Spitsbergen. I should have used a grad ND for this, but rather, I applied digital grad ND on post. |
On the contrary, my Panasonic 7-14mm doesn't have filter thread, so I am forced to stack layers of images and post-process them to mimic a long shutter ND filter. That forced me to buy the Olympus 9-18mm which has the filter thread, but the lens is frequently not wide enough for my kind of landscape photography. So thank goodness for the filter thread on the Laowa lens.
 |
| Hammerfest panoramic, stitched in-camera using the GX7. Even sometimes 7.5mm is not wide enough, but thankfully I could panorama this scene easily in camera. |
Ironically, I have to confess that I did not use my grad ND nor my Big Stopper that much during the trip. But still, the fact that there's a filter thread on the Laowa gave me that "peace of mind", knowing that I could quickly grab those filters with the Hitech holder and quickly install them on the Laowa if I really need to.
 |
| Environmental portrait of me with the little town of Honningsvag behind me. |
What I don't like from this lens?
No autofocus. This means you have to rely on 1) hyperfocal distance 2) manual focus assist and 3) smaller aperture to get tolerable depth of field on your subject. I do wish that this is an AF lens, but then it's a wide angle lens, so I can getaway with focusing it to hyperfocal and get everything in acceptable focus. This means I should focus it to the maximum focus lever rotation which is on the mark that's a little bit beyond infinity.
 |
| The Laowa being bolted onto my GX7. Thankfully, the GX7 does have some manual focus assist features that helped me getting precise focus with the Laowa. |
Things to note here:
at f/2.0 it will make anything that's about 5 meters away from you in focus, and everything beyond about 20 meters away will be in "acceptable" focus, but not perfectly tack sharp. I don't know if this is a defect, de-centering, or if it's just the nature of this lens at that aperture. At f/2.8, it displays perfect focus from 5 meters away to about infinity. At f/4.0, it will render the perfect sharpness across the frame from at least 3 meters away. So during the trip, I did most of my shooting at f/2.8 and f/4, unless I really really need to shoot at f/2 for indoor documentation or other low-light situation.
 |
| Ultra wide environmental portrait of me with the city of Tromso behind me. |
With that in mind, one might pose a question, can we still use the Laowa at f/2.0 for Astrophotography? I will need to do further test on this matter, since I don't have a clear night sky in these last few days. Also during my trip to Norway and Svalbard, the sun was there all the time 24/7, so I did not get a chance to do astro at all. However, judging from the fact that f/2.0 only produced an acceptable sharpness at infinity, it may potentially cause less than satisfactory result for Astrophotography. But looking at what it produced on my test shots so far, I think I can still do it, albeit with heavier post-processing techniques to regain sharpness on the stars.
What is so-so?
Flare is kind of in-between. I don't find it to be that distracting to be honest, unless you are shooting into a strong light source really often, in which case, you might going to encounter some large-nasty-circular flares on your photos that can be anywhere from the edges to the corners of the frame.
 |
| Enjoying a good morning in Tromso. Notice the flare on the lower edge of the frame. That's what you get mostly when shooting with a strong light source in your frame. |
I do shoot a lot of sceneries with the sun itself actually in the frames using the Laowa during the trip to Norway and Svalbard. And when there's a flare showing up in the frame because of the sun, all I did was simply adjust the composition and angle a little bit, and the flare disappeared, with no significant change to the overall composition of the particular frame. As I said, most of the flares were present at the edges of the frame, so if I was unable to change the composition at all, I can still crop a bit and get the flare cropped out, so it's not really that big of a deal for me. At the very least, I can say that the flare in this little Laowa lens is more controlable than the flare in my Panasonic 7-14mm f/4.0, even when the Panasonic lens is mounted onto a Panasonic body, because the flare in Pan 7-14mm shows up more in the center area of the frame rather than on the edges or corners like the Laowa.
 |
| Crop it, and the flares are gone. Taken near Camp Barentz. |
There's also a hint of vignetting, especially on larger apertures like f/2.8 or f/2.0. The vignetting can be easily corrected in post processing, using Lightroom or similar software. However, I somehow don't get bothered by the vignetting because I like how the vignette somewhat helps the viewer to focus more on the center of the image, where the main objects are usually placed in the frame. However, please keep in mind that I am one of those guys who always add a hint of vignettes to the images, so there's that.
 |
| The ghost town of Pyramiden. An ex-Russian-miner community, now abandoned. Notice the vignetting, it helps to get your eyes to focus on the landmark instead of the edges of the frame. |
Final words?
Last but not least, think again. For a relatively acceptable price, you get a small, lightweight, compact, wide angle(NOT FISH EYE) with truly wide focal length, with an aperture larger than f/2.8. This was
UNHEARD OF in the MFT world. Granted, it's a manual lens, but adding auto-focus will probably: 1) add more weight or 2) increase the price or 3) compromise the sharpness or 4) 1-3 all of them together at once.
 |
| Lightweight lens means more fun. I can now discover fun compositions like this one using the Laowa lens. This was taken near the city center of Hammerfest. |
So for me, all of those great aspects of the lens really outweights the small few negatives that plagued the lenses. I really think this lens is a great product. Though it's not without flaws,
it's a product that pushed the boundaries of lens design and manufacturing to a more forward direction(eventhough it's just a manual lens).
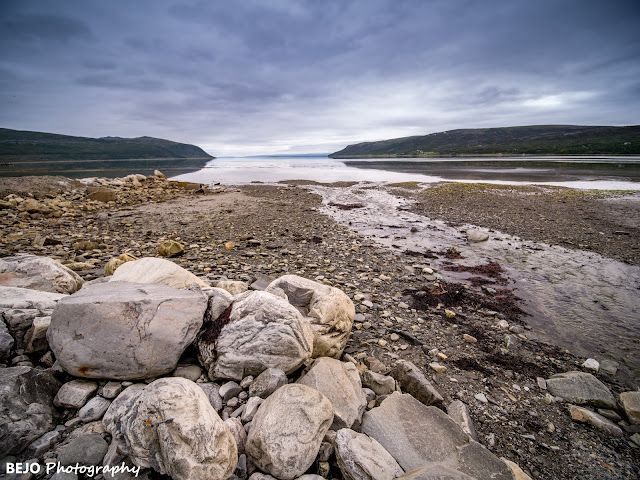 |
| Typical scenery of northern Norway region. |
As the trend of larger and heavier lenses as well as bodies continues to happen in the Micro Four Thirds format, this lens reminds us back to the original philosophy of MFT: small, lightweight, sharp, and high quality.
When the words about this lens came out in the rumors and forums, I was really really excited. It was all that I want from a wide angle lens. Now that I have it, though it's not 100% perfect, it really meets all the expectations that I have for it, and I am having fun shooting with it as well as really become inspired by the lens. In my experience, it performed well enough during the trip to Norway and Svalbard, and I will surely take it on my next trips.
 |
| Again, the fisherman village near Honningsvag, but from a different angle. Walking around trying to discover new landscape compositions is no longer a burden to me, thanks to the lightweight Laowa lens. |
Overall the Laowa 7.5mm f/2.0 is a great little lens that invirogated the Micro Four Thirds world once again with a forward-thinking, boundary-pushing product. I hope you find this review to be useful. Thank you for reading, and God bless you :)
Find me:
Youtube:
www.youtube.com/bajigurwedangronde
Instagram:
www.instagram.com/bejophotography


